Docker 101: Part 4 - Networks
In this post we will be looking at Docker Networks with its types and how to use them. The reader is expected to have a high-level understanding of Docker and Computer Networks before going through this post.
Docker network helps to facilitate communication between containers and other non-containerized services. That’s right not only can a container communicate with other containers, it can even communicate with other services and processes that are not containerized. And the best part all this is possible with minimal configuration and platform-agnostic steps.
Docker Network Types (Default)
To view the networks present in Docker run the following command
1
docker network ls
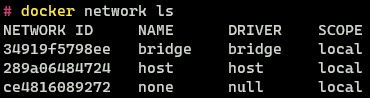
Three networks are present by default in all Docker Installations - Bridge, Host and None. The network types are also referred to as Network Drivers.
There are additional network drivers (types) that can be downloaded and used in Docker as well. Some of these are provided by Docker while some are provided by third-party vendors. Docker Networks are designed to be plug-and-play so once downloaded without any setup they can be used. Behind the scenes, Docker uses platform-specific features like iptables, port forwarding, and virtual network devices to implement the different network types. This is considered an implementation detail and should be left to Docker to manage.
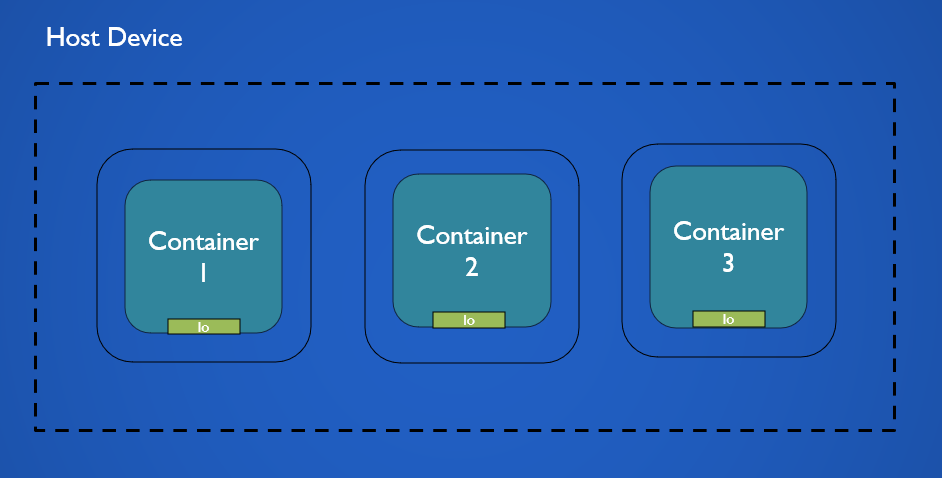
Bridge Driver
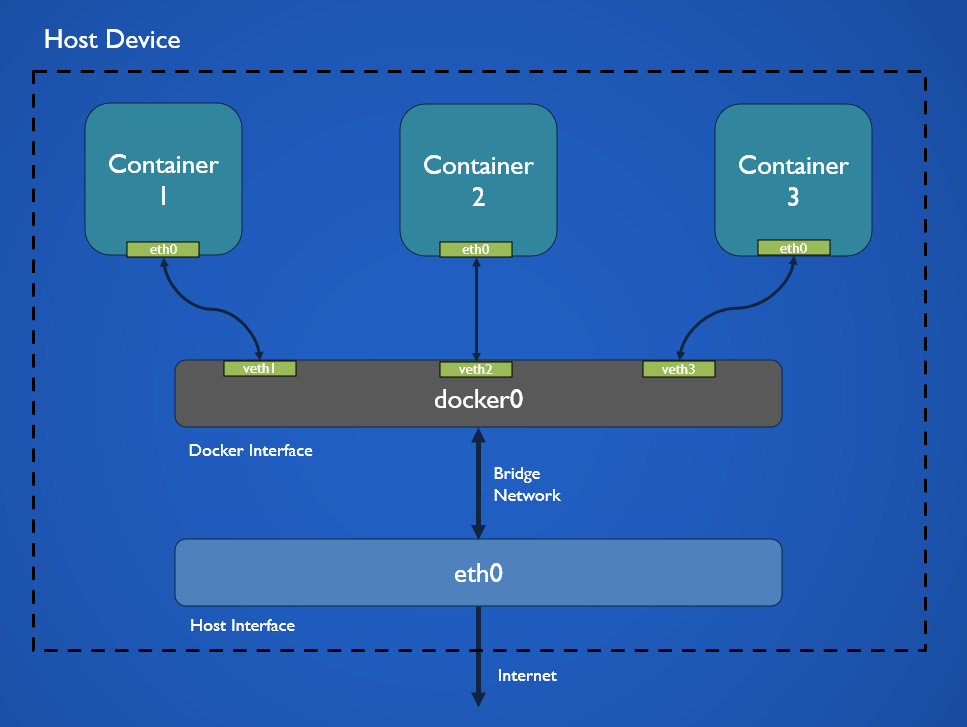
The bridge driver allows connecting of separate networks together (Similar to a physical Bridge Device). Docker creates a virtual interface called docker0. This virtual interface is connected to the network interface on the host system. The host system interface is in turn connected to the gateway (router/switch) from where it is connected to the internet.
When a new container that uses the host network is created it is connected to the docker0 interface using veth (Virtual Ethernet Device). A virtual Ethernet Device can be taught of as an Ethernet cable that is connected from a container to a switch. veth creates a virtual tunnel that allows data to flow to and from the container and docker0 interface. From here the packets travel to the network interface on the host system from where the packets can reach the internet.
Docker containers when created contain a network interface eth0 which with the help of veth is connected to a port on the virtual docker network interface. The docker0 interface has a separate namespace which means it has separate DNS, iptables, routes rules, etc. and none of the network stack components are shared with the host system interface.
Docker allows us to also create custom bridge networks. In this case, instead of docker0 a different virtual interface, that has a different namespace will be created. This custom bridge interface will also be connected to the eth0 interface of our host similar to docker0.
When a port is exposed by the container on the bridge network. Docker automatically behind the scenes creates firewall rules that forward that port to the specified port on the host system, this is why when the -p flag is used the container becomes accessible on the host network.
Containers that are connected to the same interface can communicate with each other without exposing any ports by using their container (host) names. We can use container names as the bridge networks have their own DNS server which resolves the hostname of the container to its IP address. Containers connected to the same network behave in the same way as physical devices connected to a local network.
While it’s true that all custom bridge networks have their own DNS server, this is not true for the default bridge network. On this network, containers can only connect using IP Addresses unless explicitly connected using the --link option. The default bridge network is not recommended to be used in a production environment it is only retained for legacy applications and backward compatibility. When we create a container and don’t specify a network it always connects to the default bridge network.
More details about the differences between the default bridge network and the user-defined bridge network can be found in link (5) in the references section.
Host Driver
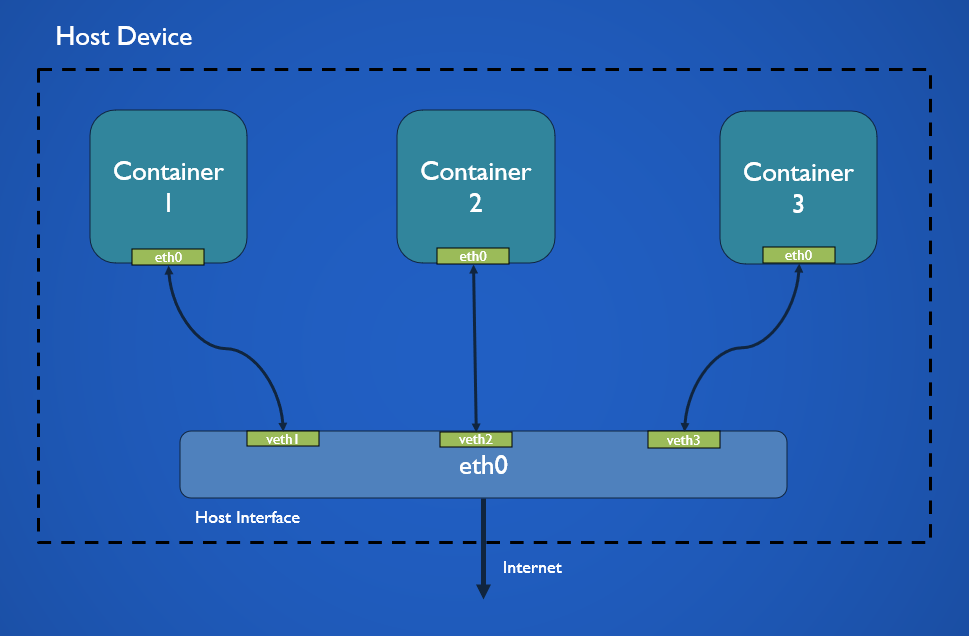
The host driver allows a container to directly bind to the network interface of the host system. The container’s network stack is not isolated from the host in this mode, the container uses the same network namespace as the host system.
As the container is not running in its isolated network it does not get a separate IP Address either. When a port is opened on the container it causes the same port to be opened on the IP Address of the host system.
The host network is supposed to be faster than bridge mode as there is no need for DNS, NAT (Network Address Translation) and other proxies between the host systems network and docker virtual network though in practice this will not be noticeable unless the container exposes a large number of ports.
Host driver only works on Linux and is not supported on Windows and MacOS
None Driver
The none driver is used when we want to run containers in complete isolation from each other and the outside world. Containers created in this mode do not have a network stack they only contain a loopback interface. There is no way for the container to connect to the host systems network interface or access the internet.
Docker Network Commands
Inspect Network
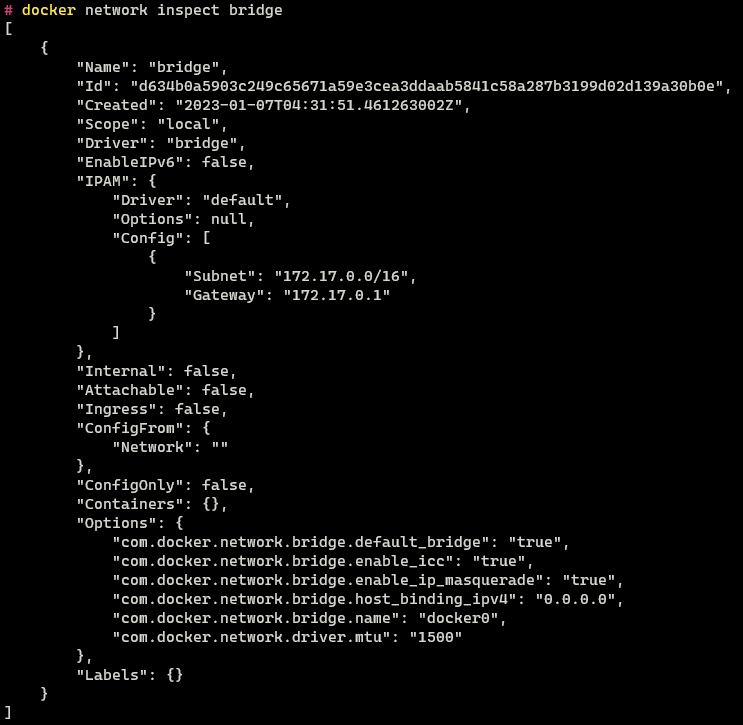
To view the configuration details of a network like a network name, id, subnet information and connected containers the network inspect command is used. A network can be inspected using its name or its id
1
2
docker network inspect <network-name>
docker network inspect bridge
Creating New Networks
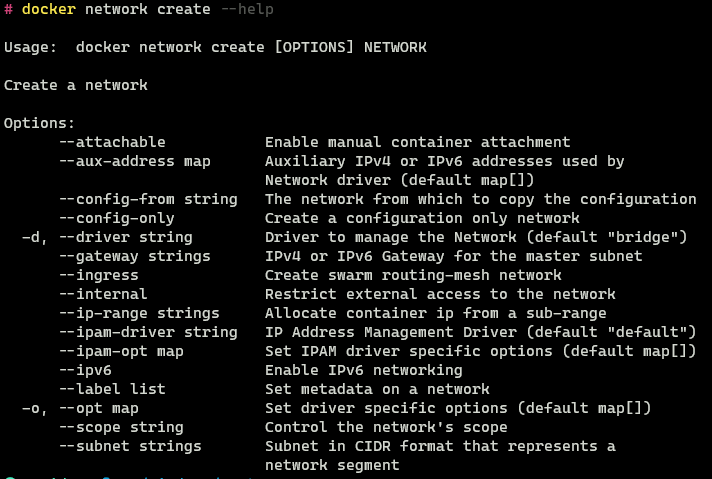
A new network can be created using the network create command. The -d flag is used to specify the driver to use to create the network (default: bridge)
1
2
docker network create -d <driver> <network-name>
docker network create docker-101

When creating a custom network there are other parameters related to the network that can be configured as well. These options are more advanced and are not required for most use cases. To view these options the --help command can be used
Adding Container to Network
A container can be attached to a network using the --net option in the container run command.
(Refer to Parts 2 and 3 in the series for more details on docker container and image commands)
1
docker container run --rm --name alpine --net docker-101 -it alpine
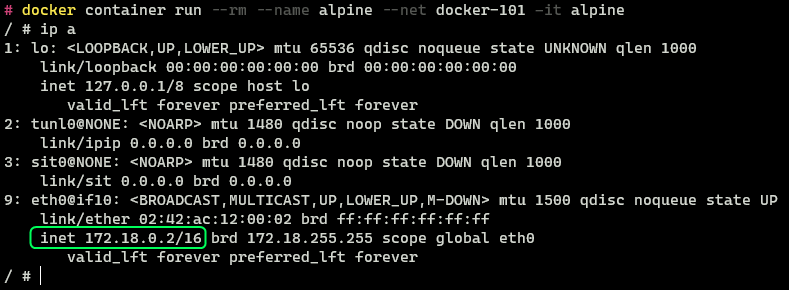
The container has been assigned an IP Address 172.18.0.2 automatically using the DHCP server of the virtual docker network. We can confirm the same information by inspecting the network configuration.
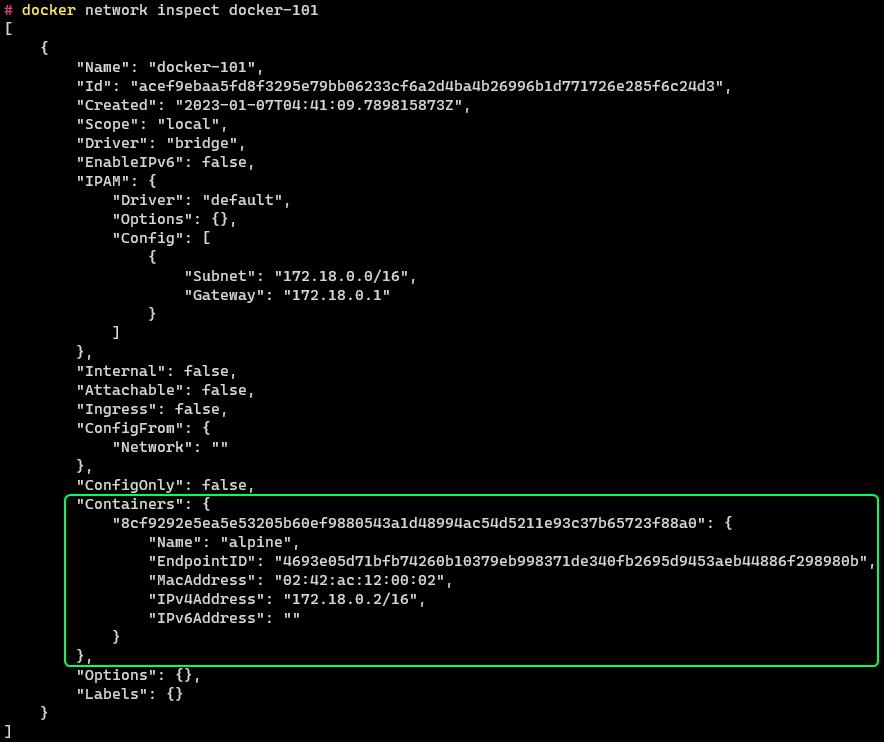
In the configuration, there is a new section called “Containers”. We can see the Alpine container is connected to this network and has the same IP Address as seen from within the container.
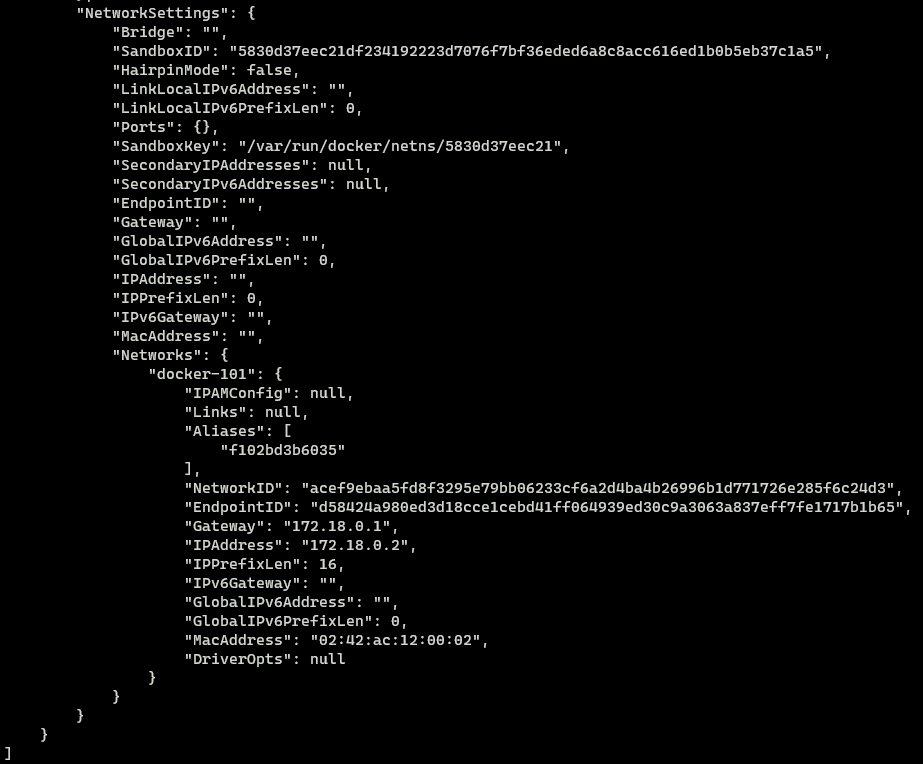
This same detail can also be verified by looking at the configuration of the container using the container inspect command.
1
docker container inspect alpine
Under the “NetworkSettings” section we can see the details related to the network. We can see that this container is indeed connected to the docker-101 network.
Exposing Port on Container
We can expose ports on the container to be accessible from the host system using the -p flag in the container run command. Using this option we can access services that are running within the container.
(Refer to Parts 2 and 3 in the series for more details on docker container and image commands)
1
2
docker container run --rm --name nginx -it \
	--net docker-101 -p 8080:80 nginx
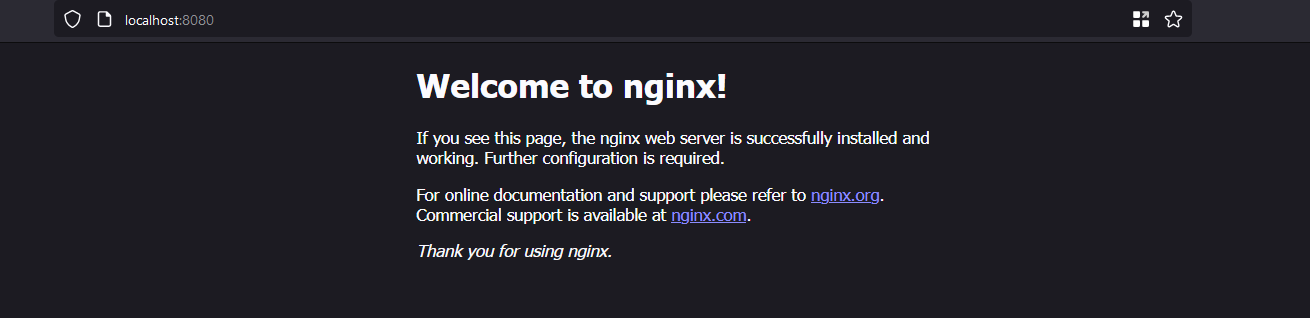
The syntax for the -p flag is as followed -p <host-port>:<container-port>. So the -p option in the above command translates to open port 80 on the container and connect it to port 8080 on the host system. This makes it such that the HTTP server that is running on the container can be accessed on port 8080 on our local system.
By exposing ports on the container from the host system we can access services that are running inside the container.
As discussed in the Host Driver Section Docker behind the scenes uses system-specific commands and features to make changes in the host systems network interface and the virtual interface that it creates to allow this communication to happen.

The ports that are exposable on a container will always be provided on the details page of the image on the Container Registries website. The same detail can be also found by using the image inspect command and consulting the Dockerfile used to build the image.
Inter-Container Communication
Containers that are on the same network can communicate with each other using their hostname. By default the hostname is the name that is assigned to the container when its created, by using the --network-alias flag a custom hostname that is different from the name of the container can be defined.
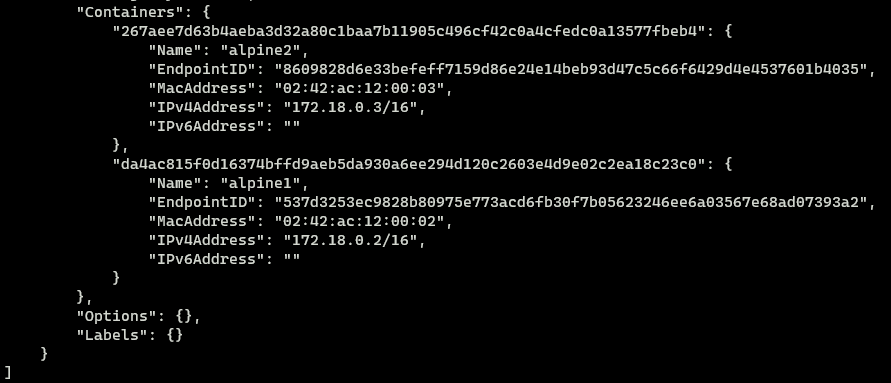
For this demonstration, I created two Alpine containers both connected to the docker-101 network that we had created before. One container is called alpine1 and the second container is called alpine2. Alpine2 is also assigned a custom hostname alpine-host
1
2
3
4
5
docker container run --rm --name alpine1 \
	--net docker-101 -it alpine

docker container run --rm --name alpine2 \
	--net docker-101 --network-alias alpine-host -it alpine

We can inspect the docker-101 network to see that indeed both containers are using it
1
docker network inspect docker-101
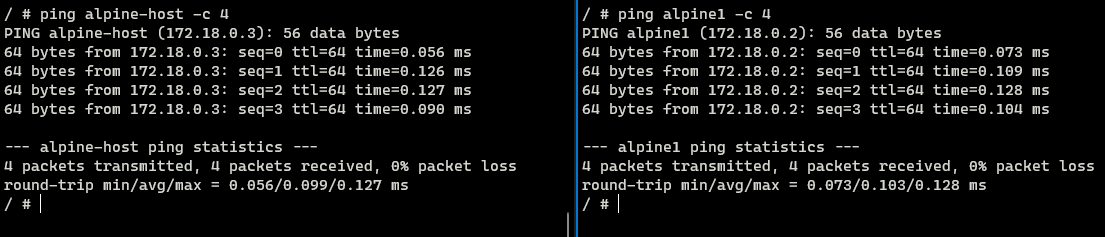
From apline1 when we ping alpine-host we can see that alpine2 is accessible from alpine1. If we perform the same in the opposite direction it still works.
From the results observed, we can conclude that containers that are running on the same network can access each other using their hostname without any special configuration.
1
2
3
4
5
# Run in Container 1 (alpine1)
ping alpine-host -c 4

# Run in Container 2 (alpine2)
ping alpine1 -c 4
If we want to access a service that is running on the host system from the container we can use the special DNS name
host.docker.internalwhich will resolve to the internal IP Address of the host. Similarly to get the IP of the host gateway the DNS namegateway.docker.internalcan be used.For more details on the same refer link (6) provided in the reference section
Host Mode Communication
As discussed earlier containers running in host mode the ports do not have to be exposed explicitly (in fact we will get a warning if we use the -p flag) as the containers are directly connected to the interface of the host system.
1
2
docker container run --rm --name nginx \
	-it --net host nginx
This mode will not work on Docker for Windows and MacOS
Now nginx will be accessible on port 80 on the host system at http://localhost:80
Add Running Container to Network
It is possible to connect and disconnect a container from a network using the network connect and network disconnect commands
1
2
3
4
5
# Connect Container to Network
docker network connect <network-name> <container-name>

# Disconnect Container from Network
docker network disconnect <network-name> <container-name>
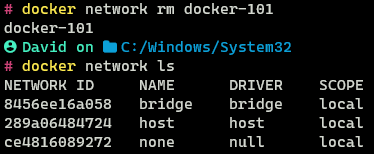
Delete a Network
Once we are done using a network it can be deleted using the network delete command
1
docker network rm docker-101
Docker Network Types (Others)
MACVLAN Driver
The MACVLAN driver makes Docker containers appear as if they are directly connected to the physical network (The container would appear like it is a physical device connected to the router/switch in the network).
Each container’s network interface gets an IP Address and MAC Address which are assigned to it by the default gateway of the network. This driver is mostly used by legacy applications that cannot function without being connected to a physical network and/or by network monitoring devices that need to be on the same network as the other devices to be able to analyze packets.
This network mode has some special requirements which need to be supported by the host system and the network gateway for it to work properly. For more details on this driver refer to link (7) provided in the references section.
IPVLAN Driver
The IPVLAN driver allows assigning containers to different networks which all appear to be connected to the host device (To the networks created by Docker the host system will appear like the router of the network).
In this mode, the containers are not assigned their own MAC Addresses but they still get a separate IP Addresses. The MAC Address of the host is shared by all the containers. By default in this mode the containers cannot access the internet, inter-network communication between the container is possible.
For more details on this network mode and its features and limitations refer to link (8) provided in the reference section.
Overlay Driver
The Overlay driver is used by default in Docker Swarm a mode that allows Docker to run and manage containers on multiple devices as if they are all part of the same network (Distributed System).
Overlay mode allows the connection of multiple Docker daemons (Docker Hosts) together into a single large system. It can be used to communicate with a container running on a standalone Docker daemon from a Swarm network as well as connect containers running on separate standalone Docker daemons.
For more details on overlay networks refer to link (9) provided in the reference section.
References
- Networking Overview | Docker Documentation
- Use bridge networks | Docker Documentation
- Use host networking | Docker Documentation
- Container networking | Docker Documentation
- Going Behind The Scenes of Docker Networking - Argus
- Explore networking features | Docker Documentation
- Use Macvlan networks | Docker Documentation
- Use IPvlan networks | Docker Documentation
- Use overlay networks | Docker Documentation